
When analyzing data in Google Analytics, it is important that the metrics are structured for easy analysis. This is especially the case in looking page URLs, where specific metrics can be split across many duplicate entries.
Here are the top three issues that I see the most that make it difficult to see metrics for individual pages:
Uppercase and Lowercase Variations
Google Analytics will look at the way the page is used in the browser. If a user uses uppercase letters, then that gets shown in a URL report. Fortunately many servers will force the URL to be lowercase, but this doesn’t happen all the time. If one URL variation has an uppercase letter and another doesn’t, the URLs will be reported on separately, causing the data to be split when it should be combined:

With or Without a Trailing Slash
Similar to using upper and lower case characters, using (or not using) a trailing slash has no impact on the page loading, but can cause the data to be split in Google Analytics making it hard to analyze. Many webmasters will force a trailing slash, but it is far from being automatic.

Query String Parameters
Query string parameters (or utm parameters) are extra pieces of data that don’t impact the way the page operates, but sends additional data to the website and Google Analytics about the source of the visitor and the type of campaign. These parameters are typically bundled with the URL and reported to Google Analytics, again, making analyzing a single page very difficult.

We are going to use Google Tag Manager to fix all three of these issues to clean up our data and make analyzing page metrics easy.
NOTE: We actually have to be running Google Analytics through Google Tag Manager for this to work. We are going to be manipulating the way the URL looks before it goes into GA.
Step 1: Create a Custom Dimension for the Query String
The Query String Parameters usually hold very valuable information. We don’t want to remove it completely. Instead we want to store it separately so we can look at it later as a Custom Dimension but it won’t be automatically appended to the URL.
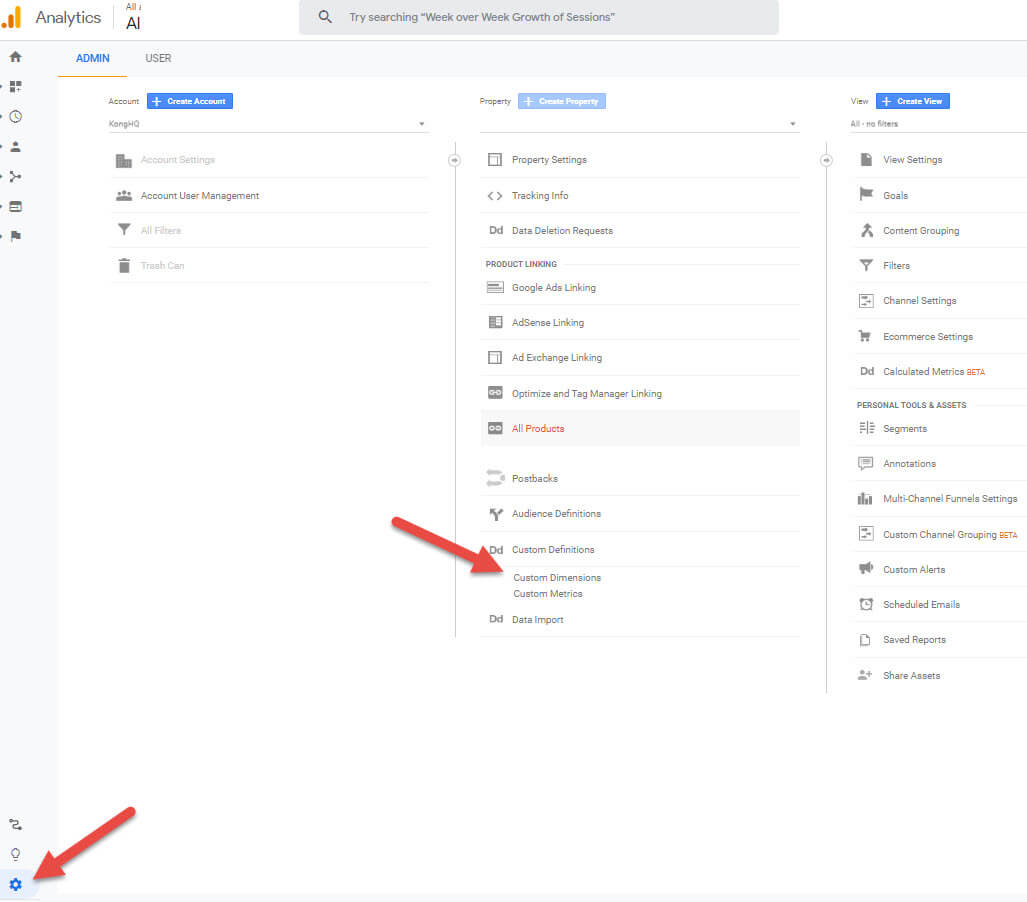
To do this, we need to visit the Google Analytics Admin (by clicking on the ‘gear’ icon in the bottom left corner and then click on the Custom Dimensions option under Custom Definitions
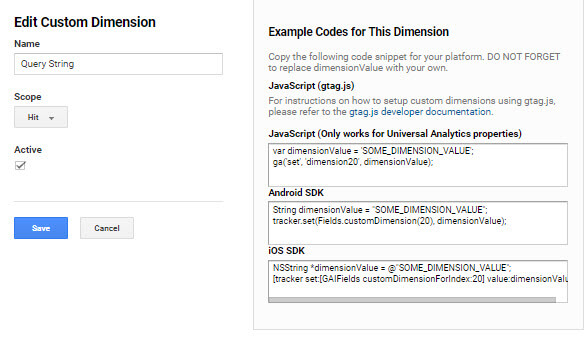
We will then need to create a new custom dimension. I called this one “Query String”. Make sure to scope it as a hit. We will also need to make note of the “index” number which we will use later. The index in this case was 20, but it will be different for you, depending on how many other custom dimensions you have used.
Step 2: Create Page Path Variable in Google Tag Manager
Inside of your Google Tag Manager container, you will need to create a “Custom JavaScript” variable. That can be done by clicking on Variables in the left menu, clicking on New next to the User-Defined Variables, and choosing the Custom JavaScript variable type.
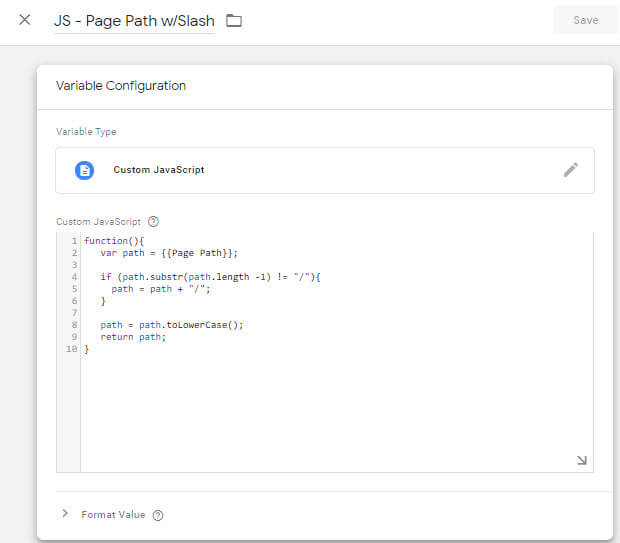
function(){
var path = {{Page Path}};

if (path.substr(path.length -1) != "/"){
path = path + "/";
}

path = path.toLowerCase();
return path;
}
This JavaScript code does three things. It first uses the “Page Path” variable that strips away any query string parameters. It then appends a trailing slash to all URLs if it doesn’t have one already. Finally it forces all URLs to be lowercase. This code effectively solves all three of our issues above.
Step 3: Create Query String Variable in Google Tag Manager
As I mentioned above, query string data contains valuable information that we might want to use later, so while we are stripping it from the URL to be pushed into Google Analytics, we are also going to store it in the custom dimension we created in Step 1. To do this, we need to create another Custom JavaScript variable that looks like this:
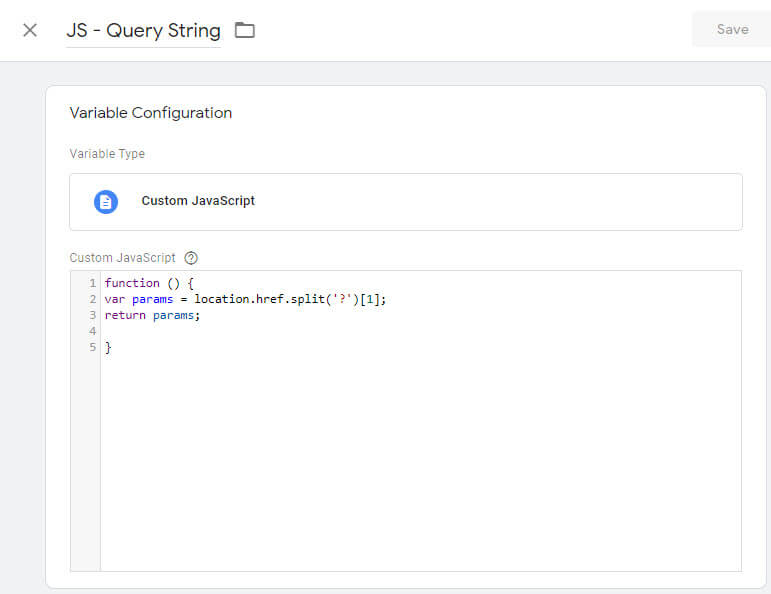
function () {
var params = location.href.split('?')[1];
return params;
}
This simple script takes the entire URL from the web browser and strips off everything before the question mark for us to use in the final step.
Step 4: Modifying the Google Analytics Settings Variable in Google Tag Manager
The last piece sends the two new JavaScript variables to Google Analytics. This is done with the Google Analytics Settings Variable.
Click on that variable and stroll to the part that says “More Settings”. We are going to add in a field under Fields to Set and a new custom dimension under Custom Dimensions.
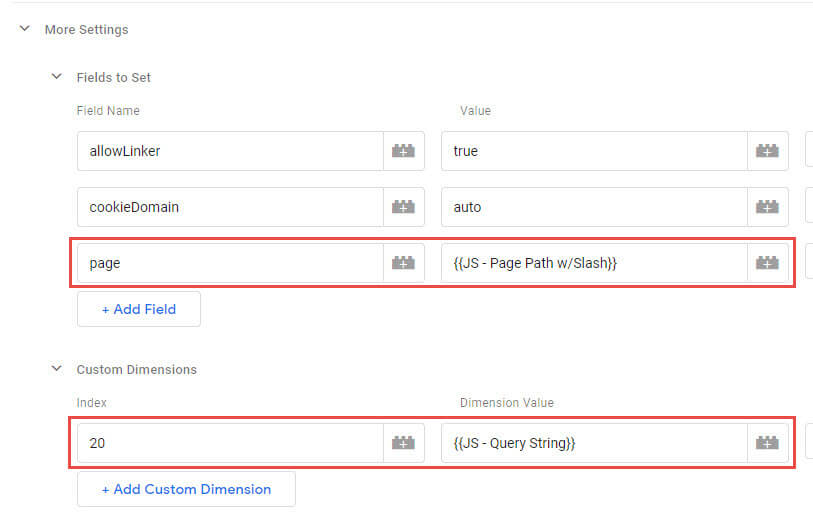
Under the Field Name use page. In the corresponding value, use the name of the JavaScript variable we created in Step 2 with the corresponding double braces ‘{{ }}’ (in this case, I called I used {{JS – Page Path w/Slash}}.
Under Index, use the index number corresponding to the custom dimension you created in Step 1. In my case, that is 20. For the corresponding Dimension Value, it is what we created in Step 3 (I used {{JS – Query String}}).
Step 5: Publish the GTM Container
That’s it! Just publish the container and you are done.
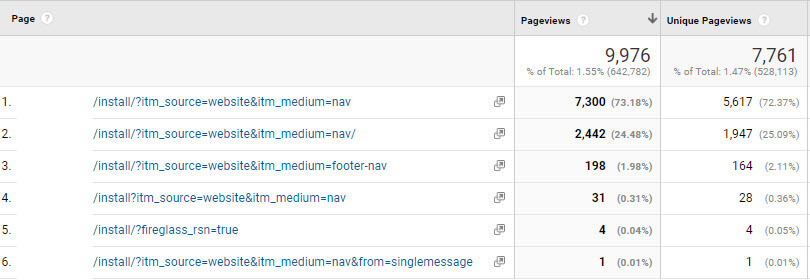
You will soon be able to see your Google Analytics URL data cleaner. In the example I used. The data went from looking like this with multiple problems:
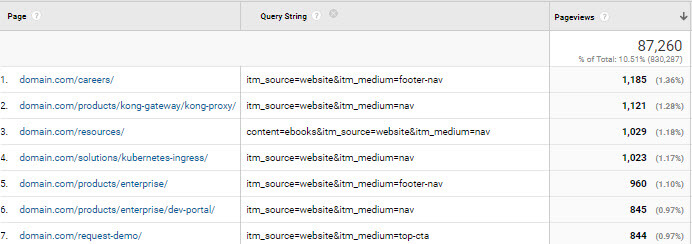
To this where we are using the new Query String custom dimension to get the query data while also having a standardized Page URL:
This solution should allow you to see Page metrics much easier as the data will automatically be aggregated around a single URL instead of split across multiple duplicate URLs.