Link building is a time-consuming process. There are a few quick wins you can get (like broken links or links from partners), but once you’ve exhausted all the low hanging fruit you’re left with the strategies that take significant time and energy. One of the most time-consuming? Guest posting.
Guest posting as a link building strategy has come under fire ever since Matt Cutts of Google declared guest posting dead for SEO purposes. However, Matt backtracked significantly to clarify he did not mean “high-quality multi-author blogs”, and in recent years, guest blogging has proven to be a viable strategy for building powerful backlinks, when done properly of course.
If you’re reading this you likely are already aware of the SEO potential a guest posting strategy can have for your site, so I won’t waste more of your time convincing you. I wrote this to help SAVE you time. So let’s jump in.
Why I Hate Bulk Prospecting

When starting prospecting for a guest post campaign, your first instinct might be to use one of the many tools out there that can automatically generate a list for you. This might sound ideal, right? Just punch in a few choice keywords and they spit out the sites you should reach out to! If only it weren’t that simple…
When using a bulk prospecting tool what you end up with is, well, bulk. These tools generally give you a huge list of hundreds if not thousands of sites that you have to manually sort through to find anything relevant to your business.
Early in my link building career, I fell for the trap of the automatic link prospecting tool too many times. Every time I would find myself spending hours upon hours individually clicking through each site only to find that the vast majority of them were either irrelevant or out of date. I knew there had to be a better way.
My Solution? Qualify As You Go

Rather than using a tool that pulls a huge list of sites I then have to narrow down, I realized there were tools I could use that would help me do most of my qualifying up front. This way I am left with a list of only high-quality and relevant sites that are ready for me to pitch them. The energy that could have been spent sorting through lists can now be put into my outreach efforts instead!
My 10 Step Guest Post Prospecting Process
Tools We’ll Be Using:
MozBar from Moz
Buzzmarker from BuzzStream
Linkclump (Chrome Extension)
NoFollow (Chrome Extension)
Step One: Choose Your Target Keywords

Before you start searching for guest post prospects you need to know what you intend to write about. Figure out your general guest post campaign or topics, and what SEO keywords you’re targeting with them. You will use your target keywords as the basis for your prospecting search.
Step Two: Use Advanced Search Queries
Don’t worry, advanced search queries aren’t too advanced. You just take a Google search operator and use it to find sites with specific mentions of guest posts. For example, you can use *intitle:”write for us”* (without the *) along with one of your target keywords to find pages with “Write For Us” in the title and your keyword somewhere on the page.
Here are some search queries you can use to find guest posts. Don’t forget to include your target keywords in the search:
- intitle:”write for us”
- intitle:”contribute to”
- Inurl:guest-post-guidelines
- inurl:category/guest
- “guest post”
- “write for us”
- “guest author”
- “guest blogger”
- “submission guidelines”
- “This guest post is from”
- “guest post by”
Step Three: Turn On the MozBar
The MozBar has an awesome feature that lets you see data about individual sites directly in the SERPs. This is important because it allows you to use Domain Authority to judge the quality of a site at once glance without even having to open it.

Domain Authority isn’t a perfect metric, but it can help you filter out low-quality sites you don’t want to bother with. Obviously, a highly relevant site with a low DA can still be a valuable link target, so don’t ignore all low DAs.
Step Four: Filter by Date
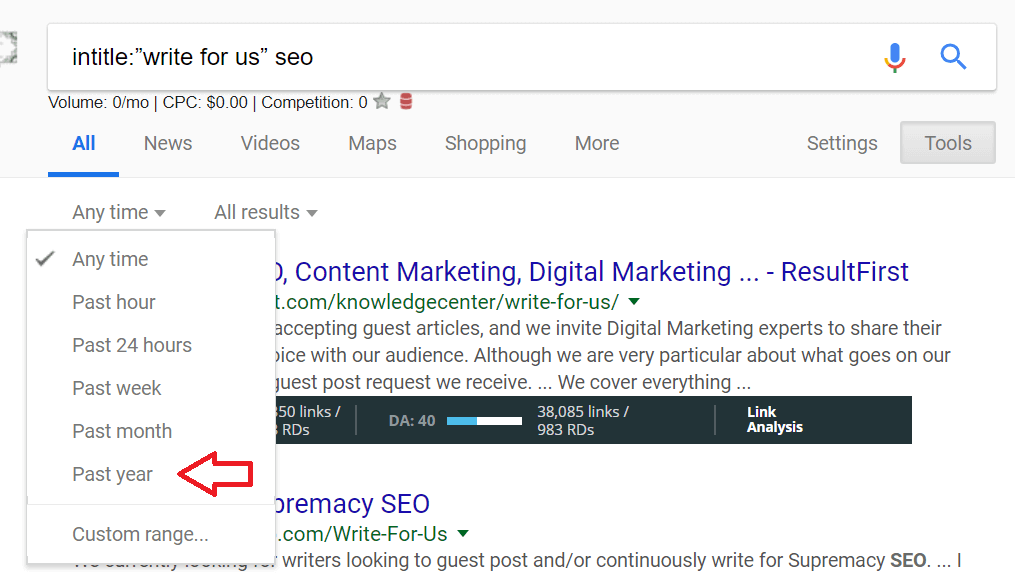
Filter the search results by date, and only include the past year. This helps you filter out sites that are no longer active, as well as sites that used to post guest authored content but have since stopped. If a year does not yield a lot of results, I sometimes expand to the past two years. 
Step Five: More Search Results Per Page
One of my favorite ways to customize Google is to change the number of results they show you on each page by expanding to 50 or a hundred This way I can keep scrolling rather than switching to the next page. It might be a short time saver, but every second counts!
To do this, select Settings > Search Settings > Results Per Page

Note: I sometimes have issues with the MozBar data loading when expanding the length of the SERP. If this occurs, go back to the default settings.
Step Six: Start Opening Up Links!
Now that our search engine results page is filtered, expanded, and has domain authority included, we can start the qualifying process! Steps 1-5 set you up so that you can qualify sites to a certain extent at a glance. From here you want to select the sites that appear most valuable and relevant and open them in a new tab.
Determining which sites are worth looking into a further is a skill that gets easier with practice. Here are a few things to look for:
- The Domain Authority: As I mentioned in step three, domain authority is not a perfect metric. However, it is the best tool we have to determine the quality of a site quickly. I generally don’t bother looking at sites with a DA less than 30. You can choose what number makes sense for you based on your own website.
- The Domain Itself: Is it a competitor site? Is it a site you know is affiliated with a competitor? Is it a huge domain like HuffPo you know you are unlikely to get a guest article published on? If you’re familiar with your space you will likely see a lot of sites you recognize and can reject on site.
- The Metadata: You can tell a lot about a site from the title and description. Derive what information you can. If you see some of your target keywords, you might want to open it up!
My Top Secret Step Six Timesaver: LinkClump
This tool lets you right-click and drag a box around a group of links, and it will open any links inside the box in a new tab. When you prospect as much as I do, this saves a ridiculous amount of time. See five sites in a row you want to check out? Don’t open them all individually, just do a quick click and drag.
Step Seven: Manually Qualifying a Site
So now you have a bunch of tabs open with potential guest post placements. Narrow these down even further by taking a quick look at the website itself. Since you already filtered out sites with low domain authorities and any competitor sites, a lot of the work is done. However, there are a few other things to look for:
-
- Do they have a blog or resource page? It might be a great site but make sure they have a blog or resource section where they post editorial content.
- Is the blog updated regularly? If there haven’t been any new updates in the past few months its possible the site is no longer being used
- Do they have recent guest posts? You are more likely to get a positive response from a site that posts guest authored content already.
- Do they link out in those guest posts? You want to build links along with your guest post. Make sure they include a link at least in the author bio, and potentially in the body content as well.
- Are the links followed? This is where the NoFollow tool comes in. This Chrome extension automatically highlights nofollow links on any web page. If all the links aren’t followed it is likely not worth reaching out.
- Do they have editorial guidelines? A lot of websites publish their guidelines for guest content online. Read through them if applicable to see if your content meets their guidelines.
- Is their content relevant to your business? Take a quick look through the content on their site to make sure you can offer something of value.
- Is it a quality site? Domain Authority only gets you so far. Use your gut for this one. Do they advertise in big letters that they accept guest post content with dofollow links? Do they post content on a huge variety of topics that have little do with one another? Are there more ads than actual content on the page? If you see a red flag like that, close the tab.
Step Eight: Save the Site in BuzzStream
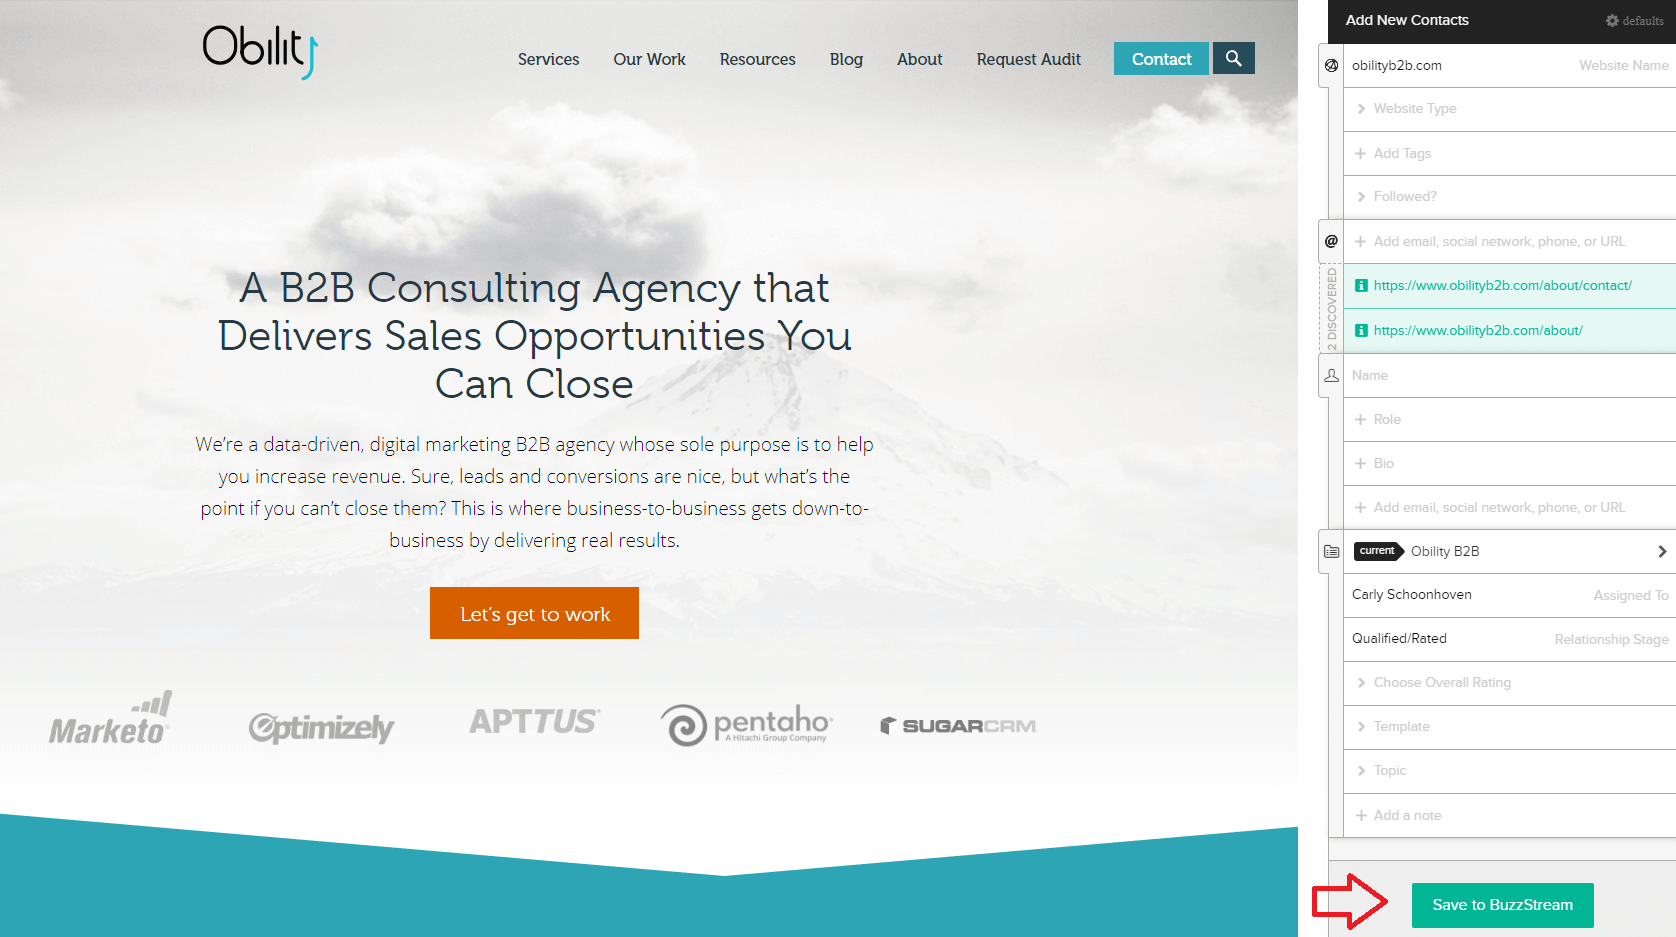
BuzzStream is one of my absolute favorite link building tools, and the Buzzmarker extension is a huge part of the reason why. BuzzStream helps me keep track of all the sites I am reaching out to, and the Buzzmarker tool makes it fast and easy to add new sites into my contact lists.
Once a site passes all your qualifiers you can use the Buzzmarker to quickly save it in BuzzStream. At this time you can add any other notes you might need when reaching out later, like a link to the editorial guidelines or contact page, or a note about what type of content you think would be a good fit.

Once the site is added into BuzzStream you can close out of the tab and know your prequalified site will be waiting there for you when you’re ready to start reaching out.
Step Nine: Repeat!
Try new keywords and advanced queries, keep going until you have a sold list of targets saved.
Step Ten: Outreach

Now that you have your pre-qualified list saved, you’re ready to start reaching out! Enjoy the freedom of knowing every site in your database has already been reviewed for quality.
Prospect Fast AND Smart
Prospecting is time-consuming, but with the right strategy you can cut down on the time considerably. The more you qualify as you go the less work you leave yourself later. Use the time you saved to go for a walk or drink a margarita. Or both!
Want more time for margaritas and walks? Let Obility do that hard work for you. Learn more about our Link Outreach Service or fill out the form below with any questions you may have.
