Obility has set itself apart in B2B marketing by not just focusing on lead form conversions, but also analyzing leads as they mature in a CRM. Historically the way this is done is by capturing UTM parameters such as utm_source, utm_medium, and utm_campaign and optimizing paid search campaigns as we see more leads, opportunities, and pipeline revenue attributed to certain campaigns.
One of the best methods in optimizing a Google Ads account is by capturing and uploading the GCLID variable.
What Is the GCLID?
When a searcher clicks on a Google Ad, they will see a “gclid” query string appended to the back of the destination URL.

This variable contains various information about the searcher as well as the keyword, ad group and campaign used to click on the ad. We can use JavaScript and capture this value, store it, and then use it to better improve the optimization of our accounts.
UTM Tracking vs GCLID Tracking
UTM Tracking can only take us so far. We are able to track the following items:
- Campaign
- Ad Group
- Keyword
- Content
- Placement
This is useful for directing ad spend towards campaigns and ad groups that perform well, but that is just a small part of what is available. Because the GCLID value from MQLs and Opportunities gets imported back into Google Ads, it becomes a separate conversion (just like we would see from front end conversions) and all of Google Ads optimization features become available.
With GCLID, we can optimize on many more items:
- Campaign
- Ad Group
- Keyword
- Content
- Placement
- Ads/Extensions
- Demographics
- Age
- Gender
- Income
- Audiences
- Remarketing
- Company Size/Industry
- In-Market
- Time/Day
- Location
- Device
How to Capture the GCLID
The best resource on how to set up the GCLID capture is this support article on Google’s website: https://support.google.com/google-ads/answer/7012522
There are three steps that need to happen in order to successful capture the GCLID:
1. Create a New Hidden Form Field
Inside the lead form, alongside other hidden form fields, we need to create another hidden field to capture the GCLID. This can usually be done through a CRM, or might have to be done manually. We will need the HTML ‘name’ attribute on the INPUT tag to be ‘gclid’.
2. Pull the GCLID From the URL and Store As a Website Cookie, Then Dynamically Load Into Form
You can load the following script into the website footer (or for an easier installation, load it into a Custom HTML tag in Google Tag Manager. This script will first capture the GCLID from the url, store it as a cookie, then inject it into the hidden form field:
<script>
function getParam(p) {
  var match = RegExp('[?&]' + p + '=([^&]*)').exec(window.location.search);
  return match && decodeURIComponent(match[1].replace(/+/g, ' '));
}
function getExpiryRecord(value) {
  var expiryPeriod = 90 * 24 * 60 * 60 * 1000; // 90 day expiry in milliseconds
  var expiryDate = new Date().getTime() + expiryPeriod;
  return {
    value: value,
    expiryDate: expiryDate
  };
}
function addGclid() {
  var gclidParam = getParam('gclid');
  var gclidFormFields = ['gclid']; // all possible gclid form field ids here
  var gclidRecord = null;
  var currGclidFormField;
  var gclsrcParam = getParam('gclsrc');
  var isGclsrcValid = !gclsrcParam || gclsrcParam.indexOf('aw') !== -1;
  gclidFormFields.forEach(function (field) {
    if (document.getElementById(field)) {
      currGclidFormField = document.getElementById(field);
    }
  });
  if (gclidParam && isGclsrcValid) {
    gclidRecord = getExpiryRecord(gclidParam);
    localStorage.setItem('gclid', JSON.stringify(gclidRecord));
  }
  var gclid = gclidRecord || JSON.parse(localStorage.getItem('gclid'));
  var isGclidValid = gclid && new Date().getTime() < gclid.expiryDate;
  if (currGclidFormField && isGclidValid) {
    currGclidFormField.value = gclid.value;
  }
}
window.addEventListener('load', addGclid);
 </script>
3. Setup the Additional GCLID Field in the CRM
Now that we are going to be pushing a new GCLID field inside the form submission, we need a place for it to go. We need to create a new field inside our CRM (ideally with the name ‘gclid’) so the data has a place to go.
The end result when submitting a form will look something like this:

Uploading the GCLID Data
In order to GCLID data, we need to first create a new conversion inside of Google Ads. The conversion can be called anything you want, but here we are going to call them “Enterprise”. You could call them MQLs, Opportunities, Closed Opps, etc.
The goal we are going to create is an imported goal from “other data sources”.
We are also going to want to leave the “Include in Conversions” checkbox unchecked so these conversions are not counted alongside our normal form fill conversion metrics.
Now we have to load up our spreadsheet with the GCLID values. In my opinion, the easiest way is to use a Google Sheets template. Here is the template provided by Google that can easily be saved and updated:
https://docs.google.com/spreadsheets/d/14sAuUIuI5uJAp2xfxa5ODXhm3EZ6uMAGIaUfsdQAgQI/edit#gid=1008980182
Also here is Google’s documentation on how the data needs to be formatted: https://support.google.com/google-ads/answer/7014069
I will typically do this upload on a monthly basis. It is important to not wait too long as the GCLIDs will expire after about 90 days.
My finished spreadsheet will look like this:
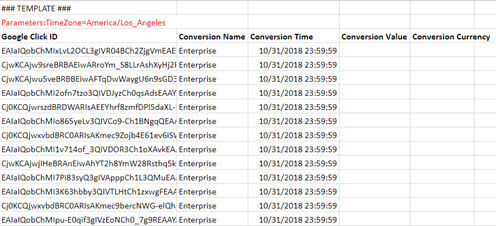
We need to make sure that the name of the conversion matches the name we created in the previous step. Also the conversion time doesn’t matter all that much. If I’m doing a monthly upload, I usually pick the last day of the month.
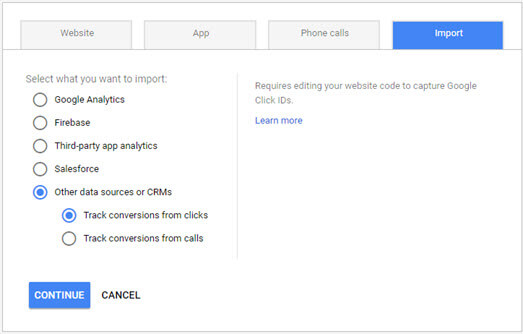
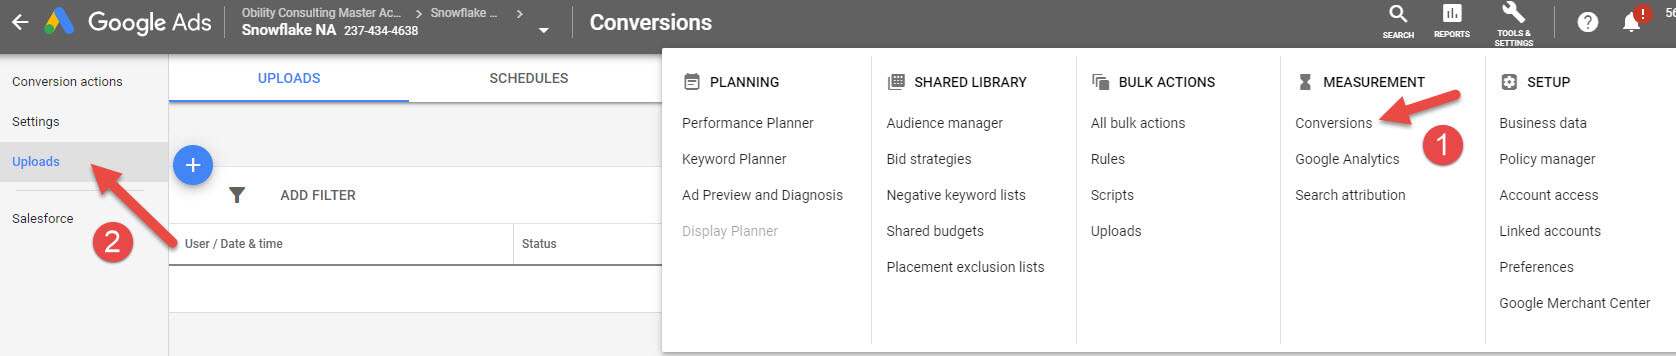
With the spreadsheet now ready, we can import it into Google Ads. This is done by first clicking on the Conversions link from the drop down menu and then clicking on Uploads on the left side
You then select your source and upload the document. If you are using a Google Sheet, you will need to invite Google Ads to view the document (which there will be instructions when you try to do it).
Once you import, you will be able to see the result of each imported GCLID. You will see here if GCLIDs were too old, or if they were otherwise invalid. You will able to use the data in about 4 hours.
How to Use GCLID Conversions to Make Optimizations
Once you have the data imported, you will be able to start using it to make bidding decisions. Because the new conversion is not going to show in the Google Ads conversions column, we need to segment our data, download a CSV into Excel, and pivot the data on the All Conversions column.
As an example, I am going to use the data from the “Age Group” demographic.

If we look at just the front end conversions and CPA, it would appear that the 18-24 year olds have the best CPA and that is where we should put our money. However, when we add on the total number of our GCLID leads, we can see that those front end leads aren’t turning into Opportunities and therefore we should do a negative bid adjustment on that audience segment.
This same practice can be done with demographics, ads, audiences, and differentiated between Search campaigns vs Display campaigns or however you want to slice the data (as long as you have enough to make statistically significant conclusions).
If you are looking for help with optimizing your PPC account with not just front end metrics, but instead on quality leads and revenue, we can help. Contact Obility today.