The number one rule at Obility is you cannot trust ad platforms. Ad platforms have an uncanny knack for enabling advertisers to waste money, and so we must offset the platforms’ impulses to spend poorly. LinkedIn is no exception.
We all want gaudy numbers, tons of leads and a huge pipeline, and so our urge is to go after the total addressable market. This is often a mistake, and we let in a bunch of bad targeting in the name of an incrementally larger prospect pool.
Targeting a best guess audience makes sense at first. You may have an ideal customer profile you plan to target. You want to be tight in your targeting, but you’ll have to make assumptions. Blocking existing customers, competitors, bad actors (e.g. bots), etc. is a good start, but finding your best fit audience should be the goal.
Over time as the data comes in, paring back your targeting will allow you to devote more dollars to your best prospects and save money on unqualified audiences.
Wasted spend is wasted opportunity. We must regularly update our demographic targeting and ruthlessly cut audiences that are not working. General steps to follow:
- Initially target best guess audience segment
- Exclude irrelevant audiences
- Review data and identify top performing audiences
- Move top performers into separate campaigns
- Restructure existing campaigns to exclude poor performing audience segments
A quick note: LinkedIn demographic reporting sucks in the UI. For all of the examples in this post, Obility pulled from the LinkedIn API and pushed into Looker so that we could see thousands of job titles, hundreds of job functions, and dozens of industries as opposed to the twenty or so LinkedIn provides in the ad platform reporting.
Targeting HR Folks
A refined targeting example: a business-to-business HR software company is looking to target individuals who provide performance management reviews and manage employee engagement. They set out to target Human Resources as a job function.
Unfortunately, Human Resources encompasses a lot of jobs other than performance management. Jobs like payroll, recruiting, and benefits management. And so when you run a job title report, you’ll see a lot of “talent acquisition” titles (shown below) as well as payroll titles and all sorts of other job titles not relevant to performance management.
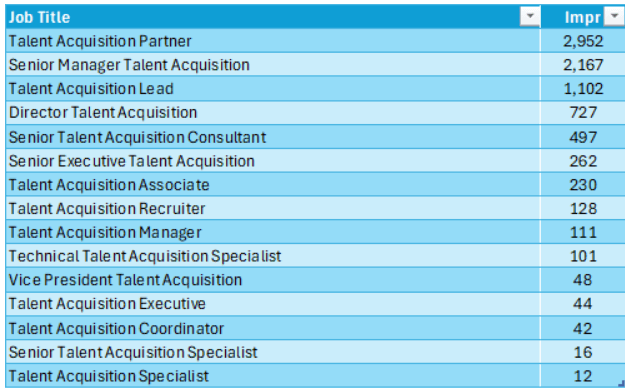
LinkedIn being LinkedIn limits the number of attributes you can target to 100 (include and/or exclude), and so it will be impossible to exclude all of the irrelevant job titles in your campaign. A better option is to target all of the relevant job titles (or at least as many as possible). Examples below:

The benefit of targeting HR was the advertiser learned all of the relevant titles that fall under the HR function. Once those titles are known, it’s time to move to more streamlined targeting. In this example, I would recommend separating the Operations roles from the People Manager roles. Although both relevant, putting them into separate campaigns allows for better messaging and performance measurement. This leads us to two campaigns:
- 20-25 performance management job titles
- 10-15 operations job titles
Job title targeting does a better job of avoiding wasting budget on irrelevant users, but we should refine it further by diving into Industry and Company Size reports. For this client, we see a clear affiliation with technology companies (nonprofits and healthcare too):
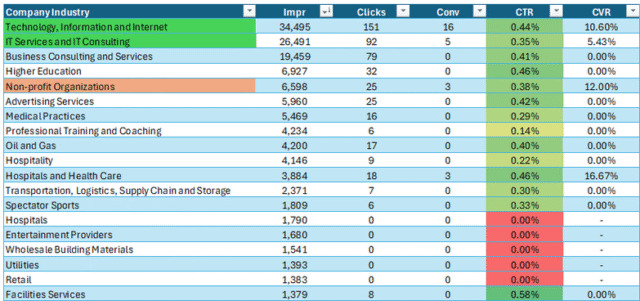
Again, we would want to separate the industries by campaign with one campaign targeting tech and separate campaigns for nonprofits and healthcare.
So if we combine our People Management job title targeting (top 25 or so job titles), layer in our best performing industries (in this case Technology, Information, and Internet and IT Services and IT Consulting), and top it off with the Human Resources job function, we get pretty close to targeting what the data suggests.
If we add company size, we are really cooking:
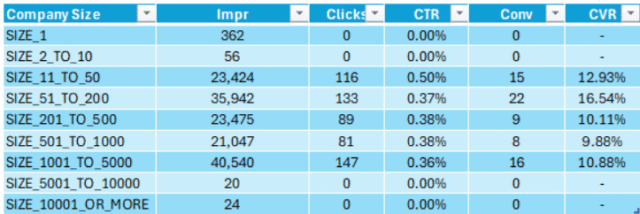
In this particular case, we have historically seen very small companies and very large companies perform poorly, and so for most campaigns we have excluded them. And so, our new target is 25 or so performance management job titles with an HR job function within a couple of industries at mid-size companies. That gives us a really strong audience where we can refine at the edges moving forward.
The additional benefit of having a very specific audience is we can talk directly to them. Rather than speaking to HR in general, we can speak directly to People Managers at mid-market tech companies. Our positioning and assets (white papers, webinars, blog posts, etc.) can all be targeted to the core audience we are targeting in a given campaign.
An example of what that ad could look like is seen below (note: this ad is not reflective of the client the above demographic data is pulled from).
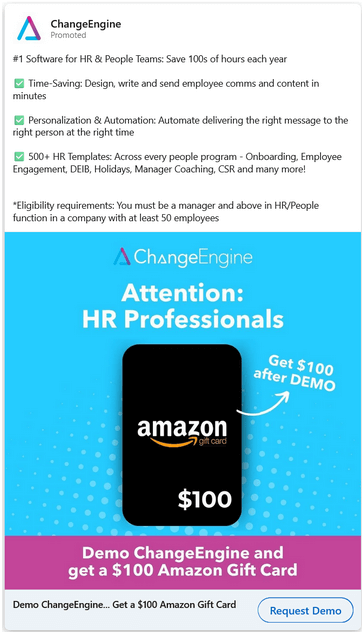
The above ad speaks directly to People Team Leads. The tight targeting would also give them the confidence to offer to pay folks for demos.
We can follow the same steps for each high performing industry and end up with the following campaigns each with relevant ads and assets that speak directly to the audience:
- 20-25 performance management job titles all industries
- 10-15 operations job titles all industries
- 20-25 performance management job titles in tech
- 10-15 operations job titles in tech
- 20-25 performance management job titles in healthcare
- 10-15 operations job titles in healthcare
- 20-25 performance management job titles in nonprofits
- 10-15 operations job titles in nonprofits
Improvement Flywheel
Relentlessly refining your targeting doesn’t just save money, it also boosts your overall metrics. If you cut out the impressions that aren’t getting clicks and the clicks that are not converting, your clickthrough rate and conversion rate are instantly going to rise. Add in the benefits of hyper-targeted ad copy, and the performance boost will keep going.
You’ll be able to pay less per click, and every click you get will be more qualified.
Relentlessly refining your audience isn’t just about saving money. Niche targeting is also about maximizing the pipeline you generate from audiences that are working. Another example:
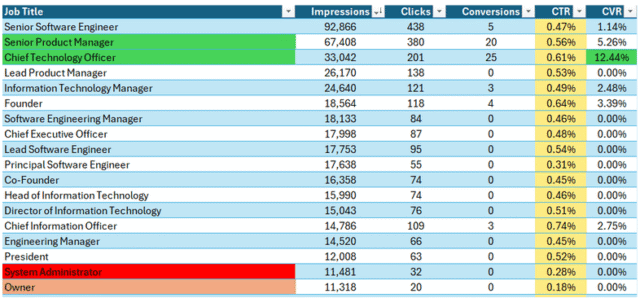
A B2B SaaS company targeting software engineers and developers has found strong success targeting with Senior Product Managers and Chief Technology Officers (CTOs):
The advertiser should continue to run campaigns targeting Information Technology, Engineering, and Product Management job functions. Congruent to those campaigns, the advertiser would benefit from targeting CTOs and Senior Product Managers directly.
In this case we aren’t cutting campaigns so much as pulling out top performers from an existing campaign.
Even with this level of targeting, we want to continue to refine and cut. The CTO and Product Manager campaigns could further be whittled down over time as we see what industries perform best. Historically, Tech, IT, and Insurance have all performed well in the broader campaign, but waiting to see performance on the new campaigns could find other successful industries.
Ultimately, successful campaigns lead to more successful campaigns and the opportunity to create tighter messaging that resonates with your audiences.
Retargeting Isn’t Immune from Cuts
A lot of advertisers tend to treat folks who have visited their website as auto-magically qualified in their retargeting campaigns. Many advertisers retarget All Site Visitors. Not such a big deal in Google Display Network or on Meta where clicks are closer to $1.50 than $15.00, but on LinkedIn retargeting campaigns should use company and job demographic qualifiers.
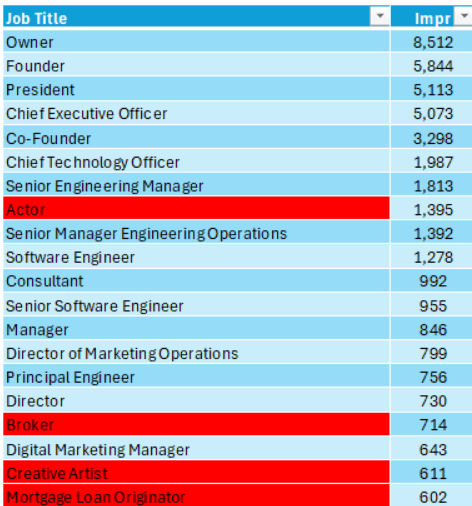
Going back to the company targeting software engineers, if we look at their unfiltered retargeting campaigns, we see some job titles that do not make sense for their typical customer.
Even with retargeting campaigns, the best bet is to filter to the audiences that are most likely to generate pipeline and closed won sales. Excluding titles, industries, companies, and job functions that are performing poorly (even in past site visitors) is a better path than simply retargeting all visitors.
Revisiting Cut Audience Segments
We can only go back to audiences we have cut with new positioning and/or new assets. There is no sense retrying something that failed unless you’re trying something new.
An example, a MarTech company is targeting various industries and successfully selling to small advertising agencies, but their ads are barely being clicked from wholesalers selling to businesses:
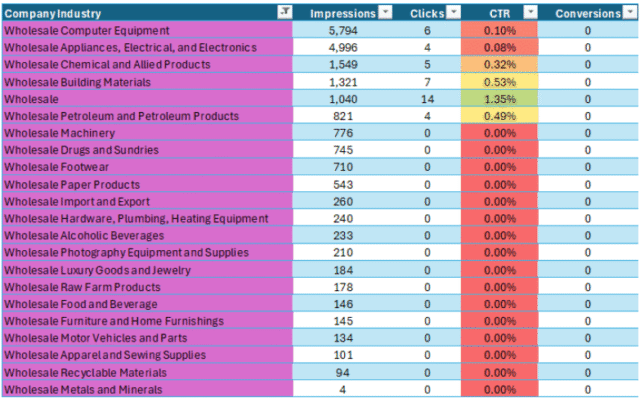
Across all industries, the MarTech company averages a 1.01% clickthrough rate (CTR). For wholesale businesses, the CTR is 0.18%. Even if the wholesale prospects are in the advertiser’s ideal customer profile, they should exclude the wholesale industry because current ads and assets are not doing the job.
You should only consider re-introducing an excluded audience once you have updated ads and assets to target that audience. Orderwise (again not the company above data is based on) does an excellent job in their LinkedIn ads of going directly at wholesalers:

This level of ad and asset audience dedication is what is required before jumping back into an audience that was failing.
Isolate, Exclude, and Revive
To fully execute these tactics, the first step is to get robust reporting so you have the data to make these decisions. This can be done manually by pulling demographics reports by campaign daily and compiling that data monthly or, preferably, automatically by pulling from LinkedIn’s API. We use Supermetrics for this task internally, and Obility’s Data Team can help you get this set up.
Once you are able to get the data, the first step is to pull out top performing audiences into their own campaigns. This gives you the opportunity to devote more budget to audiences driving pipeline as well as tailor your ads specifically to those audiences.
Step two is to exclude underperforming audiences from your existing campaign. Be merciless in your cuts. If an audience could be a potential customer, that is not a good enough reason to keep targeting it. Let the data dictate what you target.
For those audiences that you exclude that “should” be a good fit. Update your ads and offer so that it speaks to that audience. Only after those updates have been made should you try reinstituting that audience. And even in that case, target them in a separate campaign and limit your budget until you see success.